Hosting your own SMP Server
| Updated 12.10.2024 | Languages: EN, FR, CZ, PL |
Table of Contents
- Overview
- Quick start with systemd service
- Installation options
- Verifying server binaries
- Configuration
- Further configuration
- Server security
- Tor: installation and configuration
- Server information page
- Name resolution
- Documentation
- Reproduce builds
- Updating your SMP server
- Configuring the app to use the server
Overview
SMP server is the relay server used to pass messages in SimpleX network. SimpleX Chat apps have preset servers (for mobile apps these are smp11, smp12 and smp14.simplex.im), but you can easily change app configuration to use other servers.
SimpleX clients only determine which server is used to receive the messages, separately for each contact (or group connection with a group member), and these servers are only temporary, as the delivery address can change.
To create SMP server, you'll need:
- VPS or any other server.
- Your own domain, pointed at the server (
smp.example.com) - A basic Linux knowledge.
Please note: when you change the servers in the app configuration, it only affects which servers will be used for the new contacts, the existing contacts will not automatically move to the new servers, but you can move them manually using "Change receiving address" button in contact/member information pages – it will be automated in the future.
Quick start
To create SMP server as a systemd service, you'll need:
- VPS or any other server.
- Your server domain, with A and AAAA records specifying server IPv4 and IPv6 addresses (
smp1.example.com) - A basic Linux knowledge.
Please note: while you can run an SMP server without a domain name, in the near future client applications will start using server domain name in the invitation links (instead of simplex.chat domain they use now). In case a server does not have domain name and server pages (see below), the clients will be generating the links with simplex: scheme that cannot be opened in the browsers.
-
Install server with Installation script.
-
Adjust firewall:
ufw allow 80/tcp &&\ ufw allow 443/tcp &&\ ufw allow 5223/tcp -
Init server:
Replace
smp1.example.comwith your actual server domain.su smp -c 'smp-server init --yes \ --store-log \ --no-password \ --control-port \ --socks-proxy \ --source-code \ --fqdn=smp1.example.com' -
Install tor:
CODENAME="$(lsb_release -c | awk '{print $2}')" echo "deb [signed-by=/usr/share/keyrings/tor-archive-keyring.gpg] https://deb.torproject.org/torproject.org ${CODENAME} main deb-src [signed-by=/usr/share/keyrings/tor-archive-keyring.gpg] https://deb.torproject.org/torproject.org ${CODENAME} main" > /etc/apt/sources.list.d/tor.list &&\ curl --proto '=https' --tlsv1.2 -sSf https://deb.torproject.org/torproject.org/A3C4F0F979CAA22CDBA8F512EE8CBC9E886DDD89.asc | gpg --dearmor | tee /usr/share/keyrings/tor-archive-keyring.gpg >/dev/null &&\ apt update && apt install -y tor deb.torproject.org-keyring -
Configure tor:
tor-instance-create tor2 &&\
mkdir /var/lib/tor/simplex-smp/ &&\
chown debian-tor:debian-tor /var/lib/tor/simplex-smp/ &&\
chmod 700 /var/lib/tor/simplex-smp/
vim /etc/tor/torrcPaste the following:
# Enable log (otherwise, tor doesn't seem to deploy onion address)
Log notice file /var/log/tor/notices.log
# Enable single hop routing (2 options below are dependencies of the third) - It will reduce the latency at the cost of lower anonymity of the server - as SMP-server onion address is used in the clients together with public address, this is ok. If you deploy SMP-server with onion-only address, keep standard configuration.
SOCKSPort 0
HiddenServiceNonAnonymousMode 1
HiddenServiceSingleHopMode 1
# smp-server hidden service host directory and port mappings
HiddenServiceDir /var/lib/tor/simplex-smp/
HiddenServicePort 5223 localhost:5223
HiddenServicePort 443 localhost:443
vim /etc/tor/instances/tor2/torrcPaste the following:
# Log tor to systemd daemon Log notice syslog # Listen to local 9050 port for socks proxy SocksPort 9050 -
Start tor:
systemctl enable tor &&\ systemctl start tor &&\ systemctl restart tor &&\ systemctl enable --now tor@tor2 -
Install Caddy:
sudo apt install -y debian-keyring debian-archive-keyring apt-transport-https curl &&\ curl -1sLf 'https://dl.cloudsmith.io/public/caddy/stable/gpg.key' | sudo gpg --dearmor -o /usr/share/keyrings/caddy-stable-archive-keyring.gpg &&\ curl -1sLf 'https://dl.cloudsmith.io/public/caddy/stable/debian.deb.txt' | sudo tee /etc/apt/sources.list.d/caddy-stable.list &&\ sudo apt update && sudo apt install caddy -
Configure Caddy:
vim /etc/caddy/CaddyfileReplace
smp1.example.comwith your actual server domain. Paste the following:http://smp1.example.com { redir https://smp1.example.com{uri} permanent } smp1.example.com:8443 { tls { key_type rsa4096 } }vim /usr/local/bin/simplex-servers-certsReplace
smp1.example.comwith your actual server domain. Paste the following:#!/usr/bin/env sh set -eu user='smp' group="$user" domain='smp1.example.com' folder_in="/var/lib/caddy/.local/share/caddy/certificates/acme-v02.api.letsencrypt.org-directory/${domain}" folder_out='/etc/opt/simplex' key_name='web.key' cert_name='web.crt' # Copy certificate from Caddy directory to smp-server directory cp "${folder_in}/${domain}.crt" "${folder_out}/${cert_name}" # Assign correct permissions chown "$user":"$group" "${folder_out}/${cert_name}" # Copy certificate key from Caddy directory to smp-server directory cp "${folder_in}/${domain}.key" "${folder_out}/${key_name}" # Assign correct permissions chown "$user":"$group" "${folder_out}/${key_name}"chmod +x /usr/local/bin/simplex-servers-certssudo crontab -ePaste the following:
# Every week on 00:20 sunday 20 0 * * 0 /usr/local/bin/simplex-servers-certs -
Enable and start Caddy service:
Wait until "good to go" has been printed.
systemctl enable --now caddy &&\ sleep 10 &&\ /usr/local/bin/simplex-servers-certs &&\ echo 'good to go' -
Enable and start smp-server:
systemctl enable --now smp-server.service -
Print your address:
smp="$(journalctl --output cat -q _SYSTEMD_INVOCATION_ID="$(systemctl show -p InvocationID --value smp-server)" | grep -m1 'Server address:' | awk '{print $NF}' | sed 's/:443.*//')"
tor="$(cat /var/lib/tor/simplex-smp/hostname)"

echo "$smp,$tor"
Installation options
You can install SMP server in one of the following ways:
- systemd service
- using installation script - recommended
- or manually
- Docker container from DockerHub
- Linode marketplace
systemd service
Installation script
This installation script will automatically install binaries, systemd services and additional scripts that will manage backups, updates and uninstallation. This is the recommended option due to its flexibility, easy updating, and being battle tested on our servers.
Please note that currently only Ubuntu distribution is supported.
Run the following script on the server:
curl --proto '=https' --tlsv1.2 -sSf https://raw.githubusercontent.com/simplex-chat/simplexmq/stable/install.sh -o simplex-server-install.sh &&\
if echo '53fcdb4ceab324316e2c4cda7e84dbbb344f32550a65975a7895425e5a1be757 simplex-server-install.sh' | sha256sum -c; then
  chmod +x ./simplex-server-install.sh
  ./simplex-server-install.sh
  rm ./simplex-server-install.sh
else
  echo "SHA-256 checksum is incorrect!"
  rm ./simplex-server-install.sh
fi
Type 1 and hit enter to install smp-server.
Manual deployment
Manual installation is the most advanced deployment that provides the most flexibility. Generally recommended only for advanced users.
-
Install binary:
-
Using pre-compiled binaries:
curl -L https://github.com/simplex-chat/simplexmq/releases/latest/download/smp-server-ubuntu-20_04-x86-64 -o /usr/local/bin/smp-server && chmod +x /usr/local/bin/smp-server -
Compiling from source:
Please refer to Build from source: Using your distribution
-
-
Create user and group for
smp-server:sudo useradd -m smp -
Create necessary directories and assign permissions:
sudo mkdir -p /var/opt/simplex /etc/opt/simplex sudo chown smp:smp /var/opt/simplex /etc/opt/simplex -
Allow
smp-serverport in firewall:# For Ubuntu sudo ufw allow 5223/tcp sudo ufw allow 443/tcp sudo ufw allow 80/tcp # For Fedora sudo firewall-cmd --permanent --add-port=5223/tcp --add-port=443/tcp --add-port=80/tcp && \ sudo firewall-cmd --reload -
Optional — If you're using distribution with
systemd, create/etc/systemd/system/smp-server.servicefile with the following content:[Unit] Description=SMP server systemd service [Service] User=smp Group=smp Type=simple ExecStart=/usr/local/bin/smp-server start +RTS -N -RTS ExecStopPost=/usr/bin/env sh -c '[ -e "/var/opt/simplex/smp-server-store.log" ] && cp "/var/opt/simplex/smp-server-store.log" "/var/opt/simplex/smp-server-store.log.bak"' LimitNOFILE=65535 KillSignal=SIGINT TimeoutStopSec=infinity AmbientCapabilities=CAP_NET_BIND_SERVICE [Install] WantedBy=multi-user.targetAnd execute
sudo systemctl daemon-reload.
Docker container
You can deploy smp-server using Docker Compose. This is second recommended option due to its popularity and relatively easy deployment.
This deployment provides two Docker Compose files: the automatic one and manual. If you're not sure, choose automatic.
This will download images from Docker Hub.
Docker: Automatic setup
This configuration provides quick and easy way to setup your SMP server: Caddy will automatically manage Let's Encrypt certificates and redirect HTTP to HTTPS, while smp-server will serve both server information page and SMP Protocol by 443 port. 5223 port is used as fallback.
Please note that you must have 80 and 443 ports unallocated by other servers.
- Create
smp-serverdirectory and switch to it:
mkdir smp-server && cd smp-server
- Create
docker-compose.ymlfile with the following content:
You can also grab it from here - docker-compose-smp-complete.yml. Don't forget to rename it to docker-compose.yml.
name: SimpleX Chat - smp-server

services:
  oneshot:
    image: ubuntu:latest
    environment:
      CADDYCONF: |
        ${CADDY_OPTS:-}

        http://{$$ADDR} {
            redir https://{$$ADDR}{uri} permanent
        }

        {$$ADDR}:8443 {
            tls {
                key_type rsa4096
            }
        }
    command: sh -c 'if [ ! -f /etc/caddy/Caddyfile ]; then printf "$${CADDYCONF}" > /etc/caddy/Caddyfile; fi'
    volumes:
      - ./caddy_conf:/etc/caddy

  caddy:
    image: caddy:latest
    depends_on:
      oneshot:
        condition: service_completed_successfully
    cap_add:
      - NET_ADMIN
    environment:
      ADDR: ${ADDR?"Please specify the domain."}
    volumes:
      - ./caddy_conf:/etc/caddy
      - caddy_data:/data
      - caddy_config:/config
    ports:
      - 80:80
    restart: unless-stopped
    healthcheck:
      test: "test -d /data/caddy/certificates/${CERT_PATH:-acme-v02.api.letsencrypt.org-directory}/${ADDR} || exit 1"
      interval: 1s
      retries: 60

  smp-server:
    image: ${SIMPLEX_IMAGE:-simplexchat/smp-server:latest}
    depends_on:
      caddy:
        condition: service_healthy
    environment:
      ADDR: ${ADDR?"Please specify the domain."}
      PASS: ${PASS:-}
    volumes:
      - ./smp_configs:/etc/opt/simplex
      - ./smp_state:/var/opt/simplex
      - type: volume
        source: caddy_data
        target: /certificates
        volume:
          subpath: "caddy/certificates/${CERT_PATH:-acme-v02.api.letsencrypt.org-directory}/${ADDR}"
    ports:
      - 443:443
      - 5223:5223
    restart: unless-stopped

volumes:
  caddy_data:
  caddy_config:
- In the same directory, create
.envfile with the following content:
You can also grab it from here - docker-compose-smp-complete.env. Don't forget to rename it to .env.
Change variables according to your preferences.
# Mandatory
ADDR=your_ip_or_addr

# Optional
#PASS='123123'
- Start your containers:
docker compose up
Docker: Manual setup
If you know what you are doing, this configuration provides bare SMP server setup without automatically managed Let's Encrypt certificates by Caddy to serve server information page with 5223 port set as primary.
This configuration allows you to retain the ability to manage 80 and 443 ports yourself. As a downside, SMP server *can not be served to 443 port.
- Create
smp-serverdirectory and switch to it:
mkdir smp-server && cd smp-server
- Create
docker-compose.ymlfile with the following content:
You can also grab it from here - docker-compose-smp-manual.yml. Don't forget to rename it to docker-compose.yml.
name: SimpleX Chat - smp-server

services:
  smp-server:
    image: ${SIMPLEX_IMAGE:-simplexchat/smp-server:latest}
    environment:
      WEB_MANUAL: ${WEB_MANUAL:-1}
      ADDR: ${ADDR?"Please specify the domain."}
      PASS: ${PASS:-}
    volumes:
      - ./smp_configs:/etc/opt/simplex
      - ./smp_state:/var/opt/simplex
    ports:
      - 5223:5223
    restart: unless-stopped
- In the same directory, create
.envfile with the following content:
You can also grab it from here - docker-compose-smp-manual.env. Don't forget to rename it to .env.
Change variables according to your preferences.
# Mandatory
ADDR=your_ip_or_addr

# Optional
#PASS='123123'
WEB_MANUAL=1
- Start your containers:
docker compose up
Linode marketplace
You can deploy smp-server upon creating new Linode VM. Please refer to: Linode Marketplace
Verifying server binaries
Starting from v6.3 server builds are reproducible.
That also allows us to sign server releases, confirming the integrity of GitHub builds.
To verify server binaries after you downloaded them:
-
Download
_sha256sums(hashes of all server binaries) and_sha256sums.asc(signature). -
Download our key FB44AF81A45BDE327319797C85107E357D4A17FC from openpgp.org
-
Import the key with
gpg --import FB44AF81A45BDE327319797C85107E357D4A17FC. Key filename should be the same as its fingerprint, but please change it if necessary. -
Run
gpg --verify _sha256sums.asc _sha256sums. It should print:
Good signature from "SimpleX Chat chat@simplex.chat"
- Compute the hashes of the binaries you plan to use with
sha256sum <file>or withopenssl sha256 <file>and compare them with the hashes in the file_sha256sums- they must be the same.
That is it - you now verified authenticity of our GitHub server binaries.
Configuration
To see which options are available, execute smp-server without flags:
sudo su smp -c smp-server

...
Available commands:
  init                     Initialize server - creates /etc/opt/simplex and
                           /var/opt/simplex directories and configuration files
  start                    Start server (configuration:
                           /etc/opt/simplex/smp-server.ini)
  delete                   Delete configuration and log files
You can get further help by executing sudo su smp -c "smp-server <command> -h"
After that, we need to configure smp-server:
Interactively
Execute the following command:
sudo su smp -c "smp-server init"
There are several options to consider:
-
Enable store log to restore queues and messages on server restart (Yn):Enter
yto enable saving and restoring connections and messages when the server is restarted.Please note: it is important to use SIGINT to restart the server, as otherwise the undelivered messages will not be restored. The connections will be restored irrespective of how the server is restarted, as unlike messages they are added to append-only log on every change.
-
Enable logging daily statistics (yN):Enter
yto enable logging statistics in CSV format, e.g. they can be used to show aggregate usage charts inGrafana.
These statistics include daily counts of created, secured and deleted queues, sent and received messages, and also daily, weekly, and monthly counts of active queues (that is, the queues that were used for any messages). We believe that this information does not include anything that would allow correlating different queues as belonging to the same users, but please let us know, confidentially, if you believe that this can be exploited in any way.
-
Require a password to create new messaging queues?Press
Enteror enter your arbitrary password to password-protectsmp-server, ornto disable password protection. -
Enter server FQDN or IP address for certificate (127.0.0.1):Enter your domain or ip address that your smp-server is running on - it will be included in server certificates and also printed as part of server address.
Via command line options
Execute the following command:
sudo su smp -c "smp-server init -h"

...
Available options:
  -l,--store-log           Enable store log for persistence
  -s,--daily-stats         Enable logging daily server statistics
  -a,--sign-algorithm ALG  Signature algorithm used for TLS certificates:
                           ED25519, ED448 (default: ED448)
  --ip IP                  Server IP address, used as Common Name for TLS online
                           certificate if FQDN is not supplied
                           (default: "127.0.0.1")
  -n,--fqdn FQDN           Server FQDN used as Common Name for TLS online
                           certificate
  --no-password            Allow creating new queues without password
  --password PASSWORD      Set password to create new messaging queues
  -y,--yes                 Non-interactive initialization using command-line
                           options
  -h,--help                Show this help text
You should determine which flags are needed for your use-case and then execute smp-server init with -y flag for non-interactive initialization:
sudo su smp -c "smp-server init -y -<your flag> <your option>"
For example, run:
sudo su smp -c "smp-server init -y -l --ip 192.168.1.5 --password test"
to initialize your smp-server configuration with:
- restoring connections and messages when the server is restarted (
-lflag), - IP address
192.168.1.5, - protect
smp-serverwith a passwordtest.
After that, your installation is complete and you should see in your terminal output something like this:
Certificate request self-signature ok
subject=CN = 127.0.0.1
Server initialized, you can modify configuration in /etc/opt/simplex/smp-server.ini.
Run `smp-server start` to start server.
----------
You should store CA private key securely and delete it from the server.
If server TLS credential is compromised this key can be used to sign a new one, keeping the same server identity and established connections.
CA private key location: /etc/opt/simplex/ca.key
----------
SMP server v3.4.0
Fingerprint: d5fcsc7hhtPpexYUbI2XPxDbyU2d3WsVmROimcL90ss=
Server address: smp://d5fcsc7hhtPpexYUbI2XPxDbyU2d3WsVmROimcL90ss=:V8ONoJ6ICwnrZnTC_QuSHfCEYq53uLaJKQ_oIC6-ve8=@<hostnames>
The server address above should be used in your client configuration, and if you added server password it should only be shared with the other people who you want to allow using your server to receive the messages (all your contacts will be able to send messages - it does not require a password). If you passed IP address or hostnames during the initialisation, they will be printed as part of server address, otherwise replace <hostnames> with the actual server hostnames.
Further configuration
All generated configuration, along with a description for each parameter, is available inside configuration file in /etc/opt/simplex/smp-server.ini for further customization. Depending on the smp-server version, the configuration file looks something like this:
[INFORMATION]
# AGPLv3 license requires that you make any source code modifications
# available to the end users of the server.
# LICENSE: https://github.com/simplex-chat/simplexmq/blob/stable/LICENSE
# Include correct source code URI in case the server source code is modified in any way.
# If any other information fields are present, source code property also MUST be present.

source_code: https://github.com/simplex-chat/simplexmq

# Declaring all below information is optional, any of these fields can be omitted.

# Server usage conditions and amendments.
# It is recommended to use standard conditions with any amendments in a separate document.
# usage_conditions: https://github.com/simplex-chat/simplex-chat/blob/stable/PRIVACY.md
# condition_amendments: link

# Server location and operator.
# server_country: ISO-3166 2-letter code
# operator: entity (organization or person name)
# operator_country: ISO-3166 2-letter code
# website:

# Administrative contacts.
# admin_simplex: SimpleX address
# admin_email:
# admin_pgp:
# admin_pgp_fingerprint:

# Contacts for complaints and feedback.
# complaints_simplex: SimpleX address
# complaints_email:
# complaints_pgp:
# complaints_pgp_fingerprint:

# Hosting provider.
# hosting: entity (organization or person name)
# hosting_country: ISO-3166 2-letter code

[STORE_LOG]
# The server uses STM memory for persistence,
# that will be lost on restart (e.g., as with redis).
# This option enables saving memory to append only log,
# and restoring it when the server is started.
# Log is compacted on start (deleted objects are removed).
enable: on

# Undelivered messages are optionally saved and restored when the server restarts,
# they are preserved in the .bak file until the next restart.
restore_messages: on
expire_messages_days: 21
expire_ntfs_hours: 24

# Log daily server statistics to CSV file
log_stats: on

[AUTH]
# Set new_queues option to off to completely prohibit creating new messaging queues.
# This can be useful when you want to decommission the server, but not all connections are switched yet.
new_queues: on

# Use create_password option to enable basic auth to create new messaging queues.
# The password should be used as part of server address in client configuration:
# smp://fingerprint:password@host1,host2
# The password will not be shared with the connecting contacts, you must share it only
# with the users who you want to allow creating messaging queues on your server.
# create_password: password to create new queues (any printable ASCII characters without whitespace, '@', ':' and '/')

# control_port_admin_password:
# control_port_user_password:

[TRANSPORT]
# Host is only used to print server address on start.
# You can specify multiple server ports.
host: <domain/ip>
port: 5223,443
log_tls_errors: off

# Use `websockets: 443` to run websockets server in addition to plain TLS.
websockets: off
# control_port: 5224

[PROXY]
# Network configuration for SMP proxy client.
# `host_mode` can be 'public' (default) or 'onion'.
# It defines preferred hostname for destination servers with multiple hostnames.
# host_mode: public
# required_host_mode: off

# The domain suffixes of the relays you operate (space-separated) to count as separate proxy statistics.
# own_server_domains:

# SOCKS proxy port for forwarding messages to destination servers.
# You may need a separate instance of SOCKS proxy for incoming single-hop requests.
# socks_proxy: localhost:9050

# `socks_mode` can be 'onion' for SOCKS proxy to be used for .onion destination hosts only (default)
# or 'always' to be used for all destination hosts (can be used if it is an .onion server).
# socks_mode: onion

# Limit number of threads a client can spawn to process proxy commands in parallel.
# client_concurrency: 32

[INACTIVE_CLIENTS]
# TTL and interval to check inactive clients
disconnect: off
# ttl: 21600
# check_interval: 3600

[WEB]
# Set path to generate static mini-site for server information and qr codes/links
static_path: /var/opt/simplex/www

# Run an embedded server on this port
# Onion sites can use any port and register it in the hidden service config.
# Running on a port 80 may require setting process capabilities.
#http: 8000

# You can run an embedded TLS web server too if you provide port and cert and key files.
# Not required for running relay on onion address.
https: 443
cert: /etc/opt/simplex/web.crt
key: /etc/opt/simplex/web.key
Server security
Initialization
Although it's convenient to initialize smp-server configuration directly on the server, operators ARE ADVISED to initialize smp-server fully offline to protect your SMP server CA private key.
Follow the steps to quickly initialize the server offline:
-
Install Docker on your system.
-
Deploy smp-server locally.
-
Destroy the container. All relevant configuration files and keys will be available at
$HOME/simplex/smp/config. -
Move your
CAprivate key (ca.key) to the safe place. For further explanation, see the next section: Server security: Private keys. -
Copy all other configuration files except the CA key to the server:
rsync -hzasP $HOME/simplex/smp/config/ <server_user>@<server_address>:/etc/opt/simplex/
Private keys
Connection to the smp server occurs via a TLS connection. During the TLS handshake, the client verifies smp-server CA and server certificates by comparing its fingerprint with the one included in server address. If server TLS credential is compromised, this key can be used to sign a new one, keeping the same server identity and established connections. In order to protect your smp-server from bad actors, operators ARE ADVISED to move CA private key to a safe place. That could be:
- Tails live usb drive with persistent and encrypted storage.
- Offline Linux laptop.
- Bitwarden.
- Any other safe storage that satisfy your security requirements.
Follow the steps to secure your CA keys:
-
Login to your server via SSH.
-
Copy the CA key to a safe place from this file:
/etc/opt/simplex/ca.key -
Delete the CA key from the server. Please make sure you've saved your CA key somewhere safe. Otherwise, you would lose the ability to rotate the online certificate:
rm /etc/opt/simplex/ca.key
Online certificate rotation
Operators of smp servers ARE ADVISED to rotate online certificate regularly (e.g., every 3 months). In order to do this, follow the steps:
-
Create relevant folders:
mkdir -p $HOME/simplex/smp/config -
Copy the configuration files from the server to the local machine (if not yet):
rsync -hzasP <server_user>@<server_address>:/etc/opt/simplex/ $HOME/simplex/smp/config/ -
Copy your CA private key from a safe place to the local machine and name it
ca.key. -
Download latest
smp-serverbinary from Github releases:curl -L 'https://github.com/simplex-chat/simplexmq/releases/latest/download/smp-server-ubuntu-20_04-x86-64' -o smp-server -
Put the
smp-serverbinary to your$PATHand make it executable:sudo mv smp-server /usr/local/bin/ && chmod +x /usr/local/bin/smp-server -
Export a variable to configure your path to smp-server configuration:
export SMP_SERVER_CFG_PATH=$HOME/simplex/smp/config -
Execute the following command:
smp-server certThis command should print:
Certificate request self-signature ok subject=CN = <your domain or IP> Generated new server credentials ---------- You should store CA private key securely and delete it from the server. If server TLS credential is compromised this key can be used to sign a new one, keeping the same server identity and established connections. CA private key location: $HOME/simplex/smp/config/ca.key ---------- -
Remove the CA key from the config folder (make sure you have a backup!):
rm $HOME/simplex/smp/config/ca.key -
Upload new certificates to the server:
rsync -hzasP $HOME/simplex/smp/config/ <server_user>@<server_address>:/etc/opt/simplex/ -
Connect to the server via SSH and restart the service:
ssh <server_user>@<server_address> "systemctl restart smp-server" -
Done!
Tor: installation and configuration
Installation for onion address
SMP-server can also be deployed to be available via Tor network. Run the following commands as root user.
-
Install tor:
We're assuming you're using Ubuntu/Debian based distributions. If not, please refer to official tor documentation or your distribution guide.
-
Configure official Tor PPA repository:
CODENAME="$(lsb_release -c | awk '{print $2}')" echo "deb [signed-by=/usr/share/keyrings/tor-archive-keyring.gpg] https://deb.torproject.org/torproject.org ${CODENAME} main deb-src [signed-by=/usr/share/keyrings/tor-archive-keyring.gpg] https://deb.torproject.org/torproject.org ${CODENAME} main" > /etc/apt/sources.list.d/tor.list -
Import repository key:
curl --proto '=https' --tlsv1.2 -sSf https://deb.torproject.org/torproject.org/A3C4F0F979CAA22CDBA8F512EE8CBC9E886DDD89.asc | gpg --dearmor | tee /usr/share/keyrings/tor-archive-keyring.gpg >/dev/null -
Update repository index:
apt update -
Install
torpackage:apt install -y tor deb.torproject.org-keyring
-
-
Configure tor:
-
File configuration:
Open tor configuration with your editor of choice (
nano,vim,emacs,etc.):vim /etc/tor/torrcAnd insert the following lines to the bottom of configuration. Please note lines starting with
#: these are comments about each individual option.# Enable log (otherwise, tor doesn't seem to deploy onion address) Log notice file /var/log/tor/notices.log # Enable single hop routing (2 options below are dependencies of the third) - It will reduce the latency at the cost of lower anonymity of the server - as SMP-server onion address is used in the clients together with public address, this is ok. If you deploy SMP-server with onion-only address, you may want to keep standard configuration instead. SOCKSPort 0 HiddenServiceNonAnonymousMode 1 HiddenServiceSingleHopMode 1 # smp-server hidden service host directory and port mappings HiddenServiceDir /var/lib/tor/simplex-smp/ HiddenServicePort 5223 localhost:5223 HiddenServicePort 443 localhost:443 -
Create directories:
mkdir /var/lib/tor/simplex-smp/ && chown debian-tor:debian-tor /var/lib/tor/simplex-smp/ && chmod 700 /var/lib/tor/simplex-smp/
-
-
Start tor:
Enable
systemdservice and start tor. Officialtoris a bit flaky on the first start and may not create onion host address, so we're restarting it just in case.systemctl enable --now tor && systemctl restart tor -
Display onion host:
Execute the following command to display your onion host address:
cat /var/lib/tor/simplex-smp/hostname
SOCKS port for SMP PROXY
SMP-server versions starting from v5.8.0-beta.0 can be configured to PROXY smp servers available exclusively through Tor network to be accessible to the clients that do not use Tor. Run the following commands as root user.
-
Install tor as described in the previous section.
-
Execute the following command to create a new Tor daemon instance:
tor-instance-create tor2 -
Open the
tor2configuration and replace its content with the following lines:vim /etc/tor/instances/tor2/torrc# Log tor to systemd daemon Log notice syslog # Listen to local 9050 port for socks proxy SocksPort 9050 -
Enable service at startup and start the daemon:
systemctl enable --now tor@tor2You can check
tor2logs with the following command:journalctl -u tor@tor2 -
After server initialization, configure the
PROXYsection like so:... [PROXY] socks_proxy: 127.0.0.1:9050 own_server_domains: <your domain suffixes if using `log_stats: on`> ...
Server information page
SMP server SHOULD be configured to serve Web page with server information that can include admin info, server info, provider info, etc. It will also serve connection links, generated using the mobile/desktop apps. Run the following commands as root user.
Please note: this configuration is supported since v6.1.0-beta.2.
-
Add the following to your smp-server configuration (please modify fields in [INFORMATION] section to include relevant information):
vim /etc/opt/simplex/smp-server.ini[TRANSPORT] # host is only used to print server address on start host: <domain/ip> port: 443,5223 websockets: off log_tls_errors: off control_port: 5224 [WEB] https: 443 static_path: /var/opt/simplex/www cert: /etc/opt/simplex/web.crt key: /etc/opt/simplex/web.key [INFORMATION] # AGPLv3 license requires that you make any source code modifications # available to the end users of the server. # LICENSE: https://github.com/simplex-chat/simplexmq/blob/stable/LICENSE # Include correct source code URI in case the server source code is modified in any way. # If any other information fields are present, source code property also MUST be present. source_code: https://github.com/simplex-chat/simplexmq # Declaring all below information is optional, any of these fields can be omitted. # Server usage conditions and amendments. # It is recommended to use standard conditions with any amendments in a separate document. # usage_conditions: https://github.com/simplex-chat/simplex-chat/blob/stable/PRIVACY.md # condition_amendments: link # Server location and operator. server_country: <YOUR_SERVER_LOCATION> operator: <YOUR_NAME> operator_country: <YOUR_LOCATION> website: <WEBSITE_IF_AVAILABLE> # Administrative contacts. #admin_simplex: SimpleX address admin_email: <EMAIL> # admin_pgp: # admin_pgp_fingerprint: # Contacts for complaints and feedback. # complaints_simplex: SimpleX address complaints_email: <COMPLAINTS_EMAIL> # complaints_pgp: # complaints_pgp_fingerprint: # Hosting provider. hosting: <HOSTING_PROVIDER_NAME> hosting_country: <HOSTING_PROVIDER_LOCATION> -
Install the webserver. For easy deployment we'll describe the installation process of Caddy webserver on Ubuntu server:
-
Install the packages:
sudo apt install -y debian-keyring debian-archive-keyring apt-transport-https curl -
Install caddy gpg key for repository:
curl -1sLf 'https://dl.cloudsmith.io/public/caddy/stable/gpg.key' | sudo gpg --dearmor -o /usr/share/keyrings/caddy-stable-archive-keyring.gpg -
Install Caddy repository:
curl -1sLf 'https://dl.cloudsmith.io/public/caddy/stable/debian.deb.txt' | sudo tee /etc/apt/sources.list.d/caddy-stable.list -
Install Caddy:
sudo apt update && sudo apt install caddy
-
-
Replace Caddy configuration with the following:
Please replace
YOUR_DOMAINwith your actual domain (smp.example.com).vim /etc/caddy/Caddyfilehttp://YOUR_DOMAIN { redir https://YOUR_DOMAIN{uri} permanent } YOUR_DOMAIN:8443 { tls { key_type rsa4096 } } -
Enable and start Caddy service:
systemctl enable --now caddy -
Create script to copy certificates to your smp directory:
Please replace
YOUR_DOMAINwith your actual domain (smp.example.com).vim /usr/local/bin/simplex-servers-certs#!/usr/bin/env sh set -eu user='smp' group="$user" domain='HOST' folder_in="/var/lib/caddy/.local/share/caddy/certificates/acme-v02.api.letsencrypt.org-directory/${domain}" folder_out='/etc/opt/simplex' key_name='web.key' cert_name='web.crt' # Copy certificate from Caddy directory to smp-server directory cp "${folder_in}/${domain}.crt" "${folder_out}/${cert_name}" # Assign correct permissions chown "$user":"$group" "${folder_out}/${cert_name}" # Copy certificate key from Caddy directory to smp-server directory cp "${folder_in}/${domain}.key" "${folder_out}/${key_name}" # Assign correct permissions chown "$user":"$group" "${folder_out}/${key_name}" -
Make the script executable and execute it:
chmod +x /usr/local/bin/simplex-servers-certs && /usr/local/bin/simplex-servers-certs -
Check if certificates were copied:
ls -haltr /etc/opt/simplex/web* -
Create cronjob to copy certificates to smp directory in timely manner:
sudo crontab -e# Every week on 00:20 sunday 20 0 * * 0 /usr/local/bin/simplex-servers-certs -
Then:
- If you're running at least
v6.1.0-beta.2, restart the server. - If you're running below
v6.1.0-beta.2, upgrade the server.
- If you're running at least
-
Access the webpage you've deployed from your browser (
https://smp.example.org). You should see the smp-server information that you've provided in your ini file.
Name resolution
SimpleX public names (like alice.simplex) resolve to contact and channel addresses. These records are stored in the SimpleX Namespace registry contracts on Ethereum, so resolving a name means reading from an Ethereum node. Read more about SimpleX Public Names.
With the [NAMES] section enabled, your smp-server resolves names for the clients connected to it: it forwards their lookups to a local REST resolver and returns the addresses. Resolution is off by default and requires running a resolver stack (an Ethereum node plus the resolver service), which needs:
- 300 GB or more of NVMe SSD (TLC, not QLC, which stalls during sync)
- 32 GB RAM and a fast multi-core CPU
- about one day for the initial Ethereum sync
1. Deploy the resolver stack
The resolver stack (a reth + nimbus Ethereum node plus the resolver service) ships in scripts/resolver and starts with one command. See its README for details.
git clone https://github.com/simplex-chat/simplexmq
cd simplexmq/scripts/resolver
docker compose up -d
The shipped .env targets Ethereum mainnet and needs no changes. Open the peer-to-peer ports so the node can sync:
ufw allow 30303 &&\
ufw allow 9000
The resolver returns errors until the node finishes syncing, which takes about a day.
2. Check the resolver
Once synced, confirm the resolver is healthy and resolves a name:
curl -s http://127.0.0.1:8000/health
curl -s http://127.0.0.1:8000/resolve/foobar.testing
The first should report "ok": true. The second should return the records for the test name foobar.testing.
3. Point smp-server at the resolver
In /etc/opt/simplex/smp-server.ini, set the [NAMES] section:
[NAMES]
enable: on
resolver_endpoint: http://127.0.0.1:8000
No authentication is needed while smp-server and the resolver share a host over loopback. Behind a TLS reverse proxy on another host, use its HTTPS address and add credentials (resolver_auth over plain http is only allowed for loopback):
[NAMES]
enable: on
resolver_endpoint: https://names.example.com:443
resolver_auth: basic <username>:<password>
4. Restart smp-server
systemctl restart smp-server
The server logs the resolver status on start:
[NAMES] resolver enabled, endpoint=http://127.0.0.1:8000
[NAMES] endpoint probe ok
If the node is still syncing the server starts anyway, and name lookups fail until the resolver is ready.
Documentation
All necessary files for smp-server are located in /etc/opt/simplex/ folder.
Stored messages, connections, statistics and server log are located in /var/opt/simplex/ folder.
SMP server address
SMP server address has the following format:
smp://<fingerprint>[:<password>]@<public_hostname>[,<onion_hostname>]
-
<fingerprint>Your
smp-serverfingerprint of certificate. You can check your certificate fingerprint in/etc/opt/simplex/fingerprint. -
optional
<password>Your configured password of
smp-server. You can check your configured password in/etc/opt/simplex/smp-server.ini, under[AUTH]section increate_password:field. -
<public_hostname>, optional<onion_hostname>Your configured hostname(s) of
smp-server. You can check your configured hosts in/etc/opt/simplex/smp-server.ini, under[TRANSPORT]section inhost:field.
Systemd commands
To start smp-server on host boot, run:
sudo systemctl enable smp-server.service

Created symlink /etc/systemd/system/multi-user.target.wants/smp-server.service → /etc/systemd/system/smp-server.service.
To start smp-server, run:
sudo systemctl start smp-server.service
To check status of smp-server, run:
sudo systemctl status smp-server.service

● smp-server.service - SMP server
     Loaded: loaded (/etc/systemd/system/smp-server.service; enabled; vendor preset: enabled)
     Active: active (running) since Sat 2022-11-23 19:23:21 UTC; 1min 48s ago
   Main PID: 30878 (smp-server)
     CGroup: /docker/5588ab759e80546b4296a7c50ffebbb1fb7b55b8401300e9201313b720989aa8/system.slice/smp-server.service
             └─30878 smp-server start

Nov 23 19:23:21 5588ab759e80 systemd[1]: Started SMP server.
Nov 23 19:23:21 5588ab759e80 smp-server[30878]: SMP server v3.4.0
Nov 23 19:23:21 5588ab759e80 smp-server[30878]: Fingerprint: d5fcsc7hhtPpexYUbI2XPxDbyU2d3WsVmROimcL90ss=
Nov 23 19:23:21 5588ab759e80 smp-server[30878]: Server address: smp://d5fcsc7hhtPpexYUbI2XPxDbyU2d3WsVmROimcL90ss=:V8ONoJ6ICwnrZnTC_QuSHfCEYq53uLaJKQ_oIC6-ve8=@<hostnames>
Nov 23 19:23:21 5588ab759e80 smp-server[30878]: Store log: /var/opt/simplex/smp-server-store.log
Nov 23 19:23:21 5588ab759e80 smp-server[30878]: Listening on port 5223 (TLS)...
Nov 23 19:23:21 5588ab759e80 smp-server[30878]: not expiring inactive clients
Nov 23 19:23:21 5588ab759e80 smp-server[30878]: creating new queues requires password
To stop smp-server, run:
sudo systemctl stop smp-server.service
To check tail of smp-server log, run:
sudo journalctl -fu smp-server.service

Nov 23 19:23:21 5588ab759e80 systemd[1]: Started SMP server.
Nov 23 19:23:21 5588ab759e80 smp-server[30878]: SMP server v3.4.0
Nov 23 19:23:21 5588ab759e80 smp-server[30878]: Fingerprint: d5fcsc7hhtPpexYUbI2XPxDbyU2d3WsVmROimcL90ss=
Nov 23 19:23:21 5588ab759e80 smp-server[30878]: Server address: smp://d5fcsc7hhtPpexYUbI2XPxDbyU2d3WsVmROimcL90ss=:V8ONoJ6ICwnrZnTC_QuSHfCEYq53uLaJKQ_oIC6-ve8=@<hostnames>
Nov 23 19:23:21 5588ab759e80 smp-server[30878]: Store log: /var/opt/simplex/smp-server-store.log
Nov 23 19:23:21 5588ab759e80 smp-server[30878]: Listening on port 5223 (TLS)...
Nov 23 19:23:21 5588ab759e80 smp-server[30878]: not expiring inactive clients
Nov 23 19:23:21 5588ab759e80 smp-server[30878]: creating new queues requires password
Control port
Enabling control port in the configuration allows administrator to see information about the smp-server in real-time. Additionally, it allows to delete queues for content moderation and see the debug info about the clients, sockets, etc. Enabling the control port requires setting the admin and user passwords.
-
Generate two passwords for each user:
tr -dc A-Za-z0-9 </dev/urandom | head -c 20; echo -
Open the configuration file:
vim /etc/opt/simplex/smp-server.ini -
Configure the control port and replace the passwords:
[AUTH] control_port_admin_password: <your_randomly_generated_admin_password> control_port_user_password: <your_randomly_generated_user_password> [TRANSPORT] control_port: 5224 -
Restart the server:
systemctl restart smp-server
To access the control port, use:
nc 127.0.0.1 5224
or:
telnet 127.0.0.1 5224
Upon connecting, the control port should print:
SMP server control port
'help' for supported commands
To authenticate, type the following and hit enter. Change the my_generated_password with the user or admin password from the configuration:
auth my_generated_password
Here's the full list of commands, their descriptions and who can access them.
| Command | Description | Requires admin role |
|---|---|---|
stats |
Real-time statistics. Fields described in Daily statistics | - |
stats-rts |
GHC/Haskell statistics. Can be enabled with +RTS -T -RTS option |
- |
clients |
Clients information. Useful for debugging. | yes |
sockets |
General sockets information. | - |
socket-threads |
Thread information per socket. Useful for debugging. | yes |
threads |
Threads information. Useful for debugging. | yes |
server-info |
Aggregated server information. | - |
delete |
Delete known queue. Useful for content moderation. | - |
save |
Save queues/messages from memory. | yes |
help |
Help menu. | - |
quit |
Exit the control port. | - |
Daily statistics
You can enable smp-server statistics for Grafana dashboard by setting value on in /etc/opt/simplex/smp-server.ini, under [STORE_LOG] section in log_stats: field.
Logs will be stored as csv file in /var/opt/simplex/smp-server-stats.daily.log. Fields for the csv file are:
fromTime,qCreated,qSecured,qDeleted,msgSent,msgRecv,dayMsgQueues,weekMsgQueues,monthMsgQueues,msgSentNtf,msgRecvNtf,dayCountNtf,weekCountNtf,monthCountNtf,qCount,msgCount,msgExpired,qDeletedNew,qDeletedSecured,pRelays_pRequests,pRelays_pSuccesses,pRelays_pErrorsConnect,pRelays_pErrorsCompat,pRelays_pErrorsOther,pRelaysOwn_pRequests,pRelaysOwn_pSuccesses,pRelaysOwn_pErrorsConnect,pRelaysOwn_pErrorsCompat,pRelaysOwn_pErrorsOther,pMsgFwds_pRequests,pMsgFwds_pSuccesses,pMsgFwds_pErrorsConnect,pMsgFwds_pErrorsCompat,pMsgFwds_pErrorsOther,pMsgFwdsOwn_pRequests,pMsgFwdsOwn_pSuccesses,pMsgFwdsOwn_pErrorsConnect,pMsgFwdsOwn_pErrorsCompat,pMsgFwdsOwn_pErrorsOther,pMsgFwdsRecv,qSub,qSubAuth,qSubDuplicate,qSubProhibited,msgSentAuth,msgSentQuota,msgSentLarge,msgNtfs,msgNtfNoSub,msgNtfLost,qSubNoMsg,msgRecvGet,msgGet,msgGetNoMsg,msgGetAuth,msgGetDuplicate,msgGetProhibited,psSubDaily,psSubWeekly,psSubMonthly,qCount2,ntfCreated,ntfDeleted,ntfSub,ntfSubAuth,ntfSubDuplicate,ntfCount,qDeletedAllB,qSubAllB,qSubEnd,qSubEndB,ntfDeletedB,ntfSubB,msgNtfsB,msgNtfExpired
Fields description
| Field number | Field name | Field Description |
|---|---|---|
| 1 | fromTime |
Date of statistics |
| Messaging queue: | ||
| 2 | qCreated |
Created |
| 3 | qSecured |
Established |
| 4 | qDeleted |
Deleted |
| Messages: | ||
| 5 | msgSent |
Sent |
| 6 | msgRecv |
Received |
| 7 | dayMsgQueues |
Active queues in a day |
| 8 | weekMsgQueues |
Active queues in a week |
| 9 | monthMsgQueues |
Active queues in a month |
| Messages with "notification" flag | ||
| 10 | msgSentNtf |
Sent |
| 11 | msgRecvNtf |
Received |
| 12 | dayCountNtf |
Active queues in a day |
| 13 | weekCountNtf |
Active queues in a week |
| 14 | monthCountNtf |
Active queues in a month |
| Additional statistics: | ||
| 15 | qCount |
Stored queues |
| 16 | msgCount |
Stored messages |
| 17 | msgExpired |
Expired messages |
| 18 | qDeletedNew |
New deleted queues |
| 19 | qDeletedSecured |
Secured deleted queues |
| Requested sessions with all relays: | ||
| 20 | pRelays_pRequests |
- requests |
| 21 | pRelays_pSuccesses |
- successes |
| 22 | pRelays_pErrorsConnect |
- connection errors |
| 23 | pRelays_pErrorsCompat |
- compatibility errors |
| 24 | pRelays_pErrorsOther |
- other errors |
| Requested sessions with own relays: | ||
| 25 | pRelaysOwn_pRequests |
- requests |
| 26 | pRelaysOwn_pSuccesses |
- successes |
| 27 | pRelaysOwn_pErrorsConnect |
- connection errors |
| 28 | pRelaysOwn_pErrorsCompat |
- compatibility errors |
| 29 | pRelaysOwn_pErrorsOther |
- other errors |
| Message forwards to all relays: | ||
| 30 | pMsgFwds_pRequests |
- requests |
| 31 | pMsgFwds_pSuccesses |
- successes |
| 32 | pMsgFwds_pErrorsConnect |
- connection errors |
| 33 | pMsgFwds_pErrorsCompat |
- compatibility errors |
| 34 | pMsgFwds_pErrorsOther |
- other errors |
| Message forward to own relays: | ||
| 35 | pMsgFwdsOwn_pRequests |
- requests |
| 36 | pMsgFwdsOwn_pSuccesses |
- successes |
| 37 | pMsgFwdsOwn_pErrorsConnect |
- connection errors |
| 38 | pMsgFwdsOwn_pErrorsCompat |
- compatibility errors |
| 39 | pMsgFwdsOwn_pErrorsOther |
- other errors |
| Received message forwards: | ||
| 40 | pMsgFwdsRecv |
|
| Message queue subscription errors: | ||
| 41 | qSub |
All |
| 42 | qSubAuth |
Authentication errors |
| 43 | qSubDuplicate |
Duplicate SUB errors |
| 44 | qSubProhibited |
Prohibited SUB errors |
| Message errors: | ||
| 45 | msgSentAuth |
Authentication errors |
| 46 | msgSentQuota |
Quota errors |
| 47 | msgSentLarge |
Large message errors |
| 48 | msgNtfs |
XXXXXXXXXXXXXXXXXXXX |
| 49 | msgNtfNoSub |
XXXXXXXXXXXXXXXXXXXX |
| 50 | msgNtfLost |
XXXXXXXXXXXXXXXXXXXX |
| 51 | qSubNoMsg |
Removed, always 0 |
| 52 | msgRecvGet |
XXXXXXXXXXXXXXXXX |
| 53 | msgGet |
XXXXXXXXXXXXXXXXX |
| 54 | msgGetNoMsg |
XXXXXXXXXXXXXXXXX |
| 55 | msgGetAuth |
XXXXXXXXXXXXXXXXX |
| 56 | msgGetDuplicate |
XXXXXXXXXXXXXXXXX |
| 57 | msgGetProhibited |
XXXXXXXXXXXXXXXXX |
| 58 | psSub_dayCount |
Removed, always 0 |
| 59 | psSub_weekCount |
Removed, always 0 |
| 60 | psSub_monthCount |
Removed, always 0 |
| 61 | qCount |
XXXXXXXXXXXXXXXXX |
| 62 | ntfCreated |
XXXXXXXXXXXXXXXXX |
| 63 | ntfDeleted |
XXXXXXXXXXXXXXXXX |
| 64 | ntfSub |
XXXXXXXXXXXXXXXXX |
| 65 | ntfSubAuth |
XXXXXXXXXXXXXXXXX |
| 66 | ntfSubDuplicate |
XXXXXXXXXXXXXXXXX |
| 67 | ntfCount |
XXXXXXXXXXXXXXXXX |
| 68 | qDeletedAllB |
XXXXXXXXXXXXXXXXX |
| 69 | qSubAllB |
XXXXXXXXXXXXXXXXX |
| 70 | qSubEnd |
XXXXXXXXXXXXXXXXX |
| 71 | qSubEndB |
XXXXXXXXXXXXXXXXX |
| 72 | ntfDeletedB |
XXXXXXXXXXXXXXXXX |
| 73 | ntfSubB |
XXXXXXXXXXXXXXXXX |
| 74 | msgNtfsB |
XXXXXXXXXXXXXXXXX |
| 75 | msgNtfExpired |
XXXXXXXXXXXXXXXXX |
To import csv to Grafana one should:
-
Install Grafana plugin: Grafana - CSV datasource
-
Allow local mode by appending following:
[plugin.marcusolsson-csv-datasource]
allow_local_mode = true
... to
/etc/grafana/grafana.ini -
Add a CSV data source:
- In the side menu, click the Configuration tab (cog icon)
- Click Add data source in the top-right corner of the Data Sources tab
- Enter "CSV" in the search box to find the CSV data source
- Click the search result that says "CSV"
- In URL, enter a file that points to CSV content
-
You're done! You should be able to create your own dashboard with statistics.
For further documentation, see: CSV Data Source for Grafana - Documentation
Updating your SMP server
To update your smp-server to latest version, choose your installation method and follow the steps:
-
Manual deployment
-
Stop the server:
sudo systemctl stop smp-server -
Update the binary:
curl -L https://github.com/simplex-chat/simplexmq/releases/latest/download/smp-server-ubuntu-20_04-x86-64 -o /usr/local/bin/smp-server && chmod +x /usr/local/bin/smp-server -
Start the server:
sudo systemctl start smp-server
-
-
-
Execute the following command:
sudo simplex-servers-updateTo install specific version, run:
export VER=<version_from_github_releases> &&\ sudo -E simplex-servers-update -
Done!
-
-
-
Stop and remove the container:
docker rm $(docker stop $(docker ps -a -q --filter ancestor=simplexchat/smp-server --format="\{\{.ID\}\}")) -
Pull latest image:
docker pull simplexchat/smp-server:latest -
Start new container:
docker run -d \
  -p 5223:5223 \
  -p 443:443 \
  -v $HOME/simplex/smp/config:/etc/opt/simplex:z \
  -v $HOME/simplex/smp/logs:/var/opt/simplex:z \
  simplexchat/smp-server:latest
-
-
-
Pull latest images:
docker-compose --project-directory /etc/docker/compose/simplex pull -
Restart the containers:
docker-compose --project-directory /etc/docker/compose/simplex up -d --remove-orphans -
Remove obsolete images:
docker image prune
-
Reproduce builds
You can locally reproduce server binaries, following these instructions.
If you are a security expert or researcher, you can help SimpleX network and users community by signing the release checksums – we will publish your signature. Please reach out to us!
To reproduce the build you must have:
- Linux machine
x86-64architecture- Installed
docker,curlandgit
-
Download script:
curl -LO 'https://raw.githubusercontent.com/simplex-chat/simplexmq/refs/heads/master/scripts/simplexmq-reproduce-builds.sh' -
Make it executable:
chmod +x simplexmq-reproduce-builds.sh -
Execute the script with the required tag:
./simplexmq-reproduce-builds.sh 'v6.3.1'The script executes these steps (please review the script to confirm):
- builds all server binaries for the release in docker container.
- downloads binaries from the same GitHub release and compares them with the built binaries.
- if they all match, generates _sha256sums file with their checksums.
This will take a while.
-
After compilation, you should see the folder named as the tag (e.g.,
v6.3.1) with two subfolders:ls v6.3.1from-source prebuilt _sha256sumsThe file _sha256sums contains the hashes of all builds - you can compare it with the same file in GitHub release.
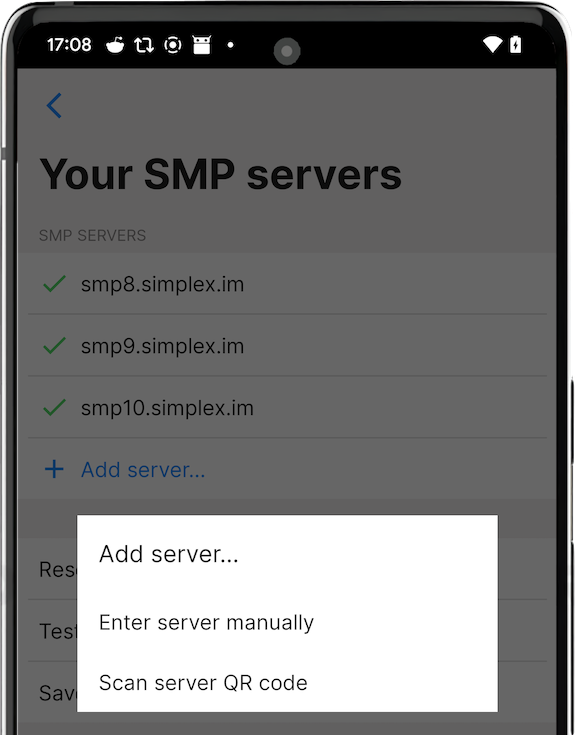
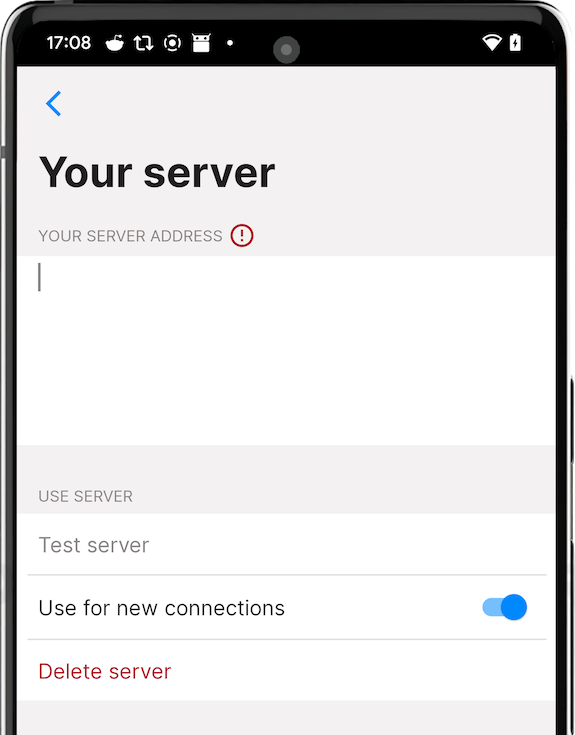
Configuring the app to use the server
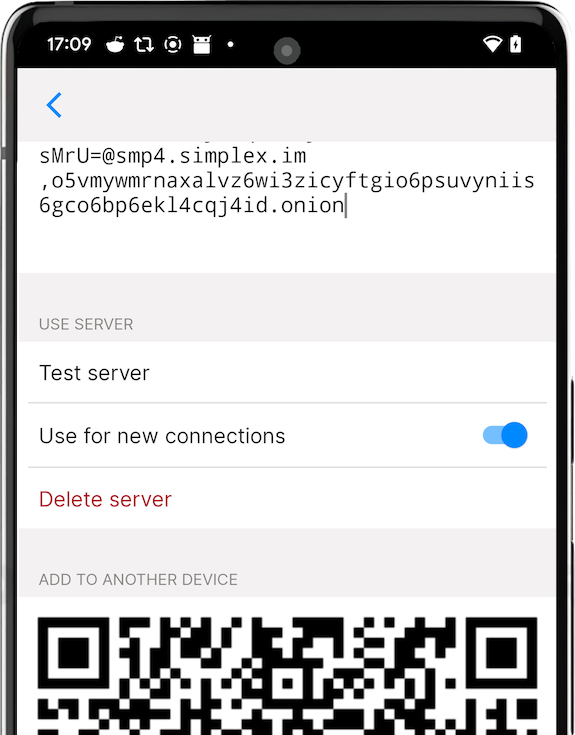
To configure the app to use your messaging server copy its full address, including password, and add it to the app. You have an option to use your server together with preset servers or without them - you can remove or disable them.
It is also possible to share the address of your server with your friends by letting them scan QR code from server settings - it will include server password, so they will be able to receive messages via your server as well.
Please note: you need SMP server version 4.0 to have password support. If you already have a deployed server, you can add password by adding it to server INI file.